![]() Easy Watermark Creator 3.8 - Tutorial
Easy Watermark Creator 3.8 - Tutorial
Easy Watermark Creator 3.8 - is an easy-to-use tool for addition of visible watermarks to your pictures and photos. You can find information about program features and areas of its application here.
- How to view examples of prepared watermark lists?
- Work steps.
- Watermark styles.
- How to select necessary watermark?
- How to edit attributes of selected watermark?
- What else can you do with watermarks?
- Text-rendering, color-rendering and picture-rendering of your image.
- How to save created image and watermark list?
- Batch wizard.
- Localization.
How to view examples of prepared watermark lists?
After installation of this program select menu item Watermark / Load or click the toolbar button ![]() . You can select any prepared watermark list from W-file in file open dialog.
. You can select any prepared watermark list from W-file in file open dialog.
- At first you can set working parameters. To do it select menu item File / Preferences.
- Tab Parameters allows you to set JPEG compression quality, TIFF compression method and to write standard or frequently used phrases which you can add to your image as watermarks (each phrase must be located in a separate line). You can preserve EXIF data of source JPEG and TIFF pictures with added watermarks to JPEG and TIFF-files (checked flag Preserve EXIF data).
- Tab Open allows you to set parameters of Advanced Open Picture Dialog and to change size of source picture by its loading (checked flag Invoke size dialog). With help of buttons
 you can set Initial source file and Initial watermark file which are loaded during start of the program. If initial file does not exist or filename string is empty, then default file name is used (Watermark.jpg and \watermarks\default.w accordingly).
- Load source image with which you will work. To do it select menu item File / Open or click the toolbar button ![]() . You can load wanted images from BMP, JPEG (JPG), PSD, PCX, PNG, TGA, TIFF(including multipage TIFF) and GIF-files. Also you can paste image from clipboard.
. You can load wanted images from BMP, JPEG (JPG), PSD, PCX, PNG, TGA, TIFF(including multipage TIFF) and GIF-files. Also you can paste image from clipboard.
Notes:
- if you choose animated GIF-file then only the first frame will be used;
- if you load multipage TIFF-file then toolbar buttons for page selection will be appeared. Numbers between these buttons show the number of the current page and total number of pages in TIFF-file;
- format TIFF is complicated and has a lot of modifications. So some TIFF-files cannot be used in the program. In this case try to convert them to some other graphical type (for example, JPEG);
- there are no EXIF data in image pasted from clipboard;
- if you put multi-page TIFF to clipboard then only single page will be pasted.
- If it is necessary, edit size of the source image (menu item Image / Size), rotate or flip it (menu items Image / Rotate or Image / Flip), crop its rectangular patch (menu item Image / Crop).
- All watermarks from prepared lists will be overlaied on your image. Select wanted watermark list (toolbar button ![]() ). If necessary you can edit attributes of used watermarks (toolbar button
). If necessary you can edit attributes of used watermarks (toolbar button ![]() ), delete unnecessary watermarks (toolbar button
), delete unnecessary watermarks (toolbar button ![]() ) and add new watermarks (toolbar button
) and add new watermarks (toolbar button ![]() ), or fully clear watermark list (toolbar button
), or fully clear watermark list (toolbar button ![]() ). Also you can create your own watermark lists.
). Also you can create your own watermark lists.
Notes:
- it is useful to create separate watermark lists (W-files) for images with frequently used sizes;
- if multipage TIFF-file is used as a source picture then the same watermark list will be added to every page of this file.
- Save created image and watermark list.
Watermark styles: Text, Picture, Date.
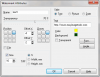
 Style: Text.
You can input text manually (field Text in dialog Watermark attributes for Style: Text) or select standard or frequently used phrases. Text watermark can also be file name, file number, current date and time or date and time from EXIF data (button ![]() in this dialog). To define set of necessary phrases use tab Parameters invoked by menu item File / Preferences.
in this dialog). To define set of necessary phrases use tab Parameters invoked by menu item File / Preferences.
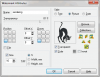
Style: Picture.
You can select picture from BMP, JPEG (JPG), GIF, PNG, PCX, PSD, ICO, TIFF, TGA-files by pressing the button Browse in dialog Watermark attributes for Style: Picture. If you choose animated GIF-file then only first frame will be used as a watermark. Also you can add images from image collections.
Style: Date.
You can set current values of date and (or) time at the moment of addition of watermarks to the image or use date and (or) time extracted from EXIF if your source JPEG and TIFF pictures have EXIF data.
How to select necessary watermark?
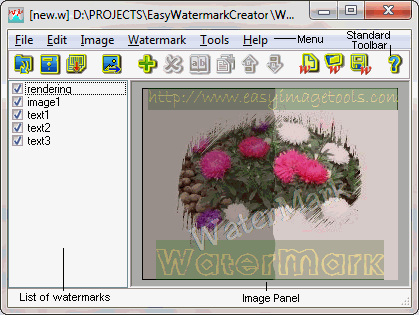
Load the wanted watermark list (toolbar button ![]() ). Watermarks checked by flags are active and you can see them on your image. There are several ways of a choice of necessary watermark (which is highlighted by red frame on the image).
). Watermarks checked by flags are active and you can see them on your image. There are several ways of a choice of necessary watermark (which is highlighted by red frame on the image).
How to select wanted watermark:
- click by the left mouse button on watermark area on image;
- select watermark name in the list, placed in the left part of the main window;
- if you want to select one of overlapped watermarks put mouse pointer to the necessary place on image and search necessary watermark with the help of hot keys Ctrl+Tab.
Note: you can do any operations only with selected watermark.
How to edit attributes of selected watermark?
Dialog Watermark attributes is intented for editing of parameters of selected watermark. There are several ways of its appearance:
- press the toolbar button ![]() ;
;
- click menu item Watermark / Edit;
- click popup menu item Edit;
- double click watermark name in the list of watermarks;
- double click watermark on the image;
- click watermark on the image with pressed key Ctrl
Dialogs for editing of watermark attributes :
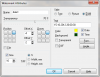
You can set and edit:
- watermark name (field Name);
- transparency of watermark from 0 to 100 % (slider Transparency);
- watermark position on your image (group of nine buttons Position);
- offset of watermark relative to chosen position (spinedits Offset X and Offset Y);
- multiple watermark positions on your picture (group of nine buttons Clones). Basic watermark is displayed always in Clones as well as it is highlighted by red frame on the picture. Offsets are identical for all clones; you can move them to the center relative to initial positions of the clones;
- tiled watermark (flag Tile);
- transparent background (flag Transparent). Transparent color is the color of bottom left pixel (except GIF-image that has its own rules for transparency);
- watermark rotation (for text and date - button Angle, for picture - buttons ![]() ,
, ![]() ,
, ![]() ,
, ![]() .
. ![]() ). You can rotate text with TrueType font only;
). You can rotate text with TrueType font only;
- Button ![]() opens dialog Edit for image editing with help of graphic tools.
opens dialog Edit for image editing with help of graphic tools.
- for text and date styles: font parameters (button Font), text color (square Color), background color (square Background).
- for date style: date and time from EXIF as watermarks if your source JPEG and TIFF pictures have EXIF data;
- source watermark size in percent of your picture size (width or height). If flag Size is checked with selected radiobutton %, then size of watermark is recalculated in percentage of source picture size; for TIFF files radiobuttons Width,mm and Height,mm define watermark size in millimeters. Also it can be useful when you change size of source picture (menu items Image / Size, Image / Crop). So if some watermark occupies 50% of width (height) of small picture, it will be increased to occupy 50% of width (height) of large picture.
What else can you do with watermarks?
You can:
- add new watermark to your image with the help of menu item Watermark / Add or the toolbar button ![]() ;
;
- delete selected watermark with the help of menu item Watermark / Delete or the toolbar button ![]() ;
;
- duplicate selected watermark with the help of menu item Watermark / Duplicate or the toolbar button ![]() ;
;
- move selected watermark in the list of watermarks using toolbar buttons ![]() ,
, ![]() ;
;
- move selected watermark on the image by mouse. Mouse cursor shows place of its initial positioning and offset direction. If flag Tile in dialog Watermark attributes is checked that this watermark you cannot move.
Text-rendering, color-rendering and picture-rendering of your image.
If flag Tile is checked (dialog Watermark attributes), the watermark will repeat itself and eventually cover the original image. You can set transparency of tiled watermark with the help of slider Transparency.
 - If you want to make text-rendered image, then you need to choose style Text, enter necessary text into field Text, set wanted color for your text and set flag Transparent.
- If you want to make text- and color-rendered image at once, then you need to do similar steps but uncheck flag Transparent and set background color around of the text.
 - If you want to make color-rendered image, then you need to choose style Text, enter any text into field Text, set identical colors for the text and background around it.
 - If you want to overlay texture on your image, then you need to choose style Picture, select picture by pressing the button Browse or Collections. You can check flag Transparent, color of bottom left pixel will be a transparent color (except GIF-image that has its own rules for transparency).
How to save created image and watermark list?
You can:
- save created watermark list as W-file. For this purpose choose menu item Watermark / Save or press the toolbar button ![]() .
.
- save created image with added watermarks as BMP, JPEG, GIF, TIFF(including multipage TIFF), PDF or PNG-file with the help of menu item File / Save as or the toolbar button ![]() . You can set JPEG compression quality on tab Parameters (menu item File / Preferences).
. You can set JPEG compression quality on tab Parameters (menu item File / Preferences).
Notes:
- if your source JPEG or TIFF picture has EXIF data then you can save image with EXIF data and added watermarks to JPEG and TIFF-files (checked flag Preserve EXIF data on tab Parameters of the dialog Preferences);
- transformation of large picture to PDF can take a long time (especially if it is a scanned TIFF-image);
- output images in PDF-files are placed on separate pages; they are stretched keeping proportions to whole page size.
- copy created image with watermarks to clipboard in BMP-format with the help of menu item File / Copy to clipboard or the toolbar button ![]() ;
;
- add necessary watermark list to the group of images with the help of dialog Batch Wizard, which appears after choice menu item File / Batch Wizard or after pressing the toolbar button ![]() .
.
Easy Watermark Creator is needed tool for photographers and graphic designers. Dialog Batch Wizard allows to speed up radically tiresome addition of watermarks to the large image group.
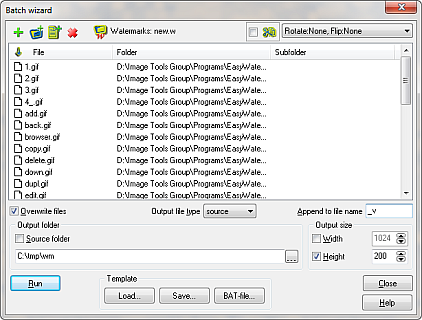 At first you must create necessary list of the images that will add watermarks.
You can add:
- single image file to the list, using button ![]() ;
;
- all image files from selected folder of your computer (including subfolders) using button ![]() .
.
The button ![]() is intended for selection of text file with the list of graphical file names.
is intended for selection of text file with the list of graphical file names.
What else can you do with source images from the list before they will be stamped by watermarks?
You can:
- delete selected file(s) with the help of the button ![]() ;
;
- crop rectangular patch from all source images simultaneously using button ![]() and checked flag;
and checked flag;
- set Rotation and Flip operations for all source images simultaneously using drop-down list;
- sort files and folders by clicking headers of columns: File, Folder, Subfolder.
The button ![]() is intended for selection of wanted List of watermarks (W-file) as template.
is intended for selection of wanted List of watermarks (W-file) as template.
Note: if you use text macro definitions (name and sequence number of picture, current date and time or from EXIF) as watermarks then your template will be variable.
Group Template gives you possibility to save and load batch operations as templates.
Note: operations with templates are available in bussines license of the program only.
The button Load... loads template from your computer.
The button Save... saves operations with images as a template.
The button BAT-file... saves operations with images as a BAT-file.
What is necessary to know about output files?
1. You can save output files to the source or other folder, overwrite old files (checked flag Overwrite files), form output file names (field Append to file name).
2. You can change size of output files, if flags Width and (or) Height are checked.
3. It is possible to set output file type: source type or BMP, JPG, TIFF(including multipage TIFF), PNG, PDF, GIF.
PCX, TGA and PSD files will be saved to files in JPEG format.
To start watermark addition press button Run. If process is successful then you see how file icons change its marks from ![]() to
to ![]() . If file processing is negative then you see icon
. If file processing is negative then you see icon ![]() . You can abort group processing by pressing Esc or by button Run (which has caption Stop during file processing).
. You can abort group processing by pressing Esc or by button Run (which has caption Stop during file processing).
Easy Watermark Creator supports multi-language interface. Program interface may be seen in one of human languages. It includes menus, screen messages, all texts used in interface. To change language use menu item Help / Language.