![]() Easy Frame Creator 2.5 - Tutorial
Easy Frame Creator 2.5 - Tutorial
Easy Frame Creator 2.5 is intended for quick and easy creation of frames on images or without them. With help of this program you can also improve quality of photos, create unique collages and abstract pictures, using a set of effects. You can find information about program features here.
- How to view examples of prepared templates?
- Work steps.
- How to create a frame outside of the source image?
- How to create a frame inside of the source image?
- How to add outside frame to source frame?
- How to apply several outside or inside frames to the source image simultaneously?
- Styles of inside frames.
- How to apply styles of inside frames to outside frames?
- How to add pins to the image?
- Use of effects for source image or texture.
- How to save created image?
- Localization.
How to view examples of prepared templates?
After installation of this program select menu item File / Templates or click the toolbar button ![]() . You can select any prepared template from drop-down list in opening dialog Templates.
. You can select any prepared template from drop-down list in opening dialog Templates.
- To create new image you must select menu item File / Load image or click the toolbar button ![]() . You can load picture from BMP, JPEG (JPG), PSD, PCX, PNG and GIF- files. It is possible to change the size of the loaded image in dialog Image size.
. You can load picture from BMP, JPEG (JPG), PSD, PCX, PNG and GIF- files. It is possible to change the size of the loaded image in dialog Image size.
Note: If you choose animated GIF- file then only the first frame will be used.
- If necessary rotate (menu item Image / Rotate), flip (menu item Image / Flip) source image or crop its rectangular patch (menu item Image / Crop), edit this image and apply set of effects to it (menu item Image / Effects).
- Now all prepared templates can be used for your image. Select the most desired template. If necessary edit the form, style, parameters of a frame and background around it. You can update your image by pressing toolbar button ![]() to reflect the current state of editing parameters.
to reflect the current state of editing parameters.
- Save received result.
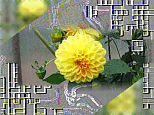
How to create a frame outside of the source image?
 You can make a rectangular frame outside of the source image.
- Select Frameless from drop-down list Frame Style.
- In spinedits Left, Right, Top, Bottom group Outside you can set different values for widths of outside frame. Button ![]() is intended for group setting of these values.
is intended for group setting of these values.
- Fill this frame by color, gradient or texture (BMP, JPEG, JPG, PSD, PCX, PNG and GIF- files) using drop-down list in group Background on Attributes Panel.
Notes:
1). background of outside frame is always opaque;
2). you can apply several outside frames or outside and inside frames to the source image simultaneously.
How to create a frame inside of the source image?
Unlike outside frames you can create frames with different forms and styles inside the source image.
- In spinedits Left, Right, Top, Bottom group Outside set zero values if you do not want to use outside frame.
- Select the frame shape (button Shape) and set frame parameters in spinedit Segments (if frame shape has curved lines) and in spinedit Width.
- Around all frame shapes, except shape1, you can set a background (group Background: Color, Gradient, Texture) with a different value of a transparency (spinedit Transparency). If opaque background color identical to background color of your web- page you will see your picture inside an original frame.
- Select one of seven styles of inside frame from drop-down list Frame Style and set necessary parameters.
Note: you can apply several inside frames to the source image simultaneously.
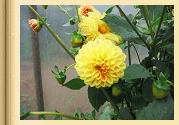
How to add outside frame to inside frame?
To add outside frame to inside frame it is necessary in spinedits Left, Right, Top, Bottom group Outside (and usually in spinedit Transparency) set nonzero values. See example (inside main window).
Note: use of outside and inside frames simultaneously is not possible if you select frame styles Filled and Icon with unchecked flag Use Background Setting.
How to apply several inside frames to the source image simultaneously?
 You can apply several outside or inside frames to the image step by step using toolbar button
 ![]() .
.
The choice of style for inside frame is performed with drop-down list Frame Style. After selection you will see parameters of the style and can edit them. The detailed information illustrated by examples you can find in the Help.
 |
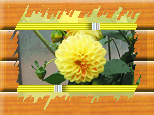
Exact The frame filled by texture from BMP, JPEG (JPG), GIF, PSD, PCX or PNG- file exactly follows the given form. For a choice of frame texture press the button Border. You can switch border transparency (color of the left bottom pixel) on. The button |
 |
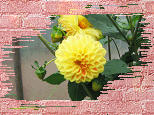
Filled There are several methods of image filling by rectangle and circle elements. Elements can have different or identical sizes and colors, can be placed in grid points or chaotically. - The elements fill only frame (flags Use Background Setting and Fill Background are not checked). - The elements fill a frame and background fill image area around frame (only flag Use Background Setting is checked). - The elements fill a frame and image area around frame (only flag Fill Background is checked). - The elements fill a frame and image area with background around frame (both flags Use Background Setting and Fill Background are checked). Background around frame can have different values of transparency. |
| Icon This style allows you to place full-size icons along the border of the frame. For a choice of icon image from BMP, JPEG ( JPG ), GIF, PSD, PCX, PNG- files press the button Border. You can switch border transparency (color of the left bottom pixel) on. The button Note: all other frames (described below) are filled by background (color, gradient, texture) with transparency values and with application of effects. |
|
 |
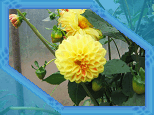
Gradient This frame gives smooth transition from a background to the image. For this purpose frame width should be not too small. This frame style allows to create unique collages - the layered images. |
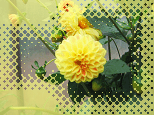
| Pixel Dots This frame is filled by background broken by pixel dots of the source image. All pixel dots have the identical size. You can set size of pixel dots and change their color on inverse. |
|
 |
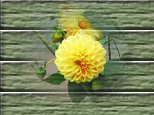
Line This frame is filled by background broken by lines of the source image. You can set width, tilting angle of the lines and method of frame filling. |
 |
Bubble This frame is filled by background broken by bubbles of the source image. Bubbles can have the different or identical sizes. You can set their tilting angle and frequency of frame filling. |
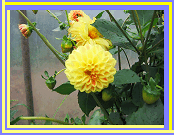
How to apply styles of inside frames to outside frames?
 - Inside frame not is used (Frame Style: Frameless).
- Increase the size of source image (from different sides or at choice) at the expense of outside frame. For example, we add 8 pixels from each side and fill frame with yellow color.
- Use toolbar button ![]() to fix current image with the frame as source image. Now all manipulations we shall make with this new image.
to fix current image with the frame as source image. Now all manipulations we shall make with this new image.
- Add inside frame to the image (for example, Frame Style: Line) with parameters: Angle=4, Width=48. Select rectangular frame (shape1) by pressing the button Shape. Set frame width= 8 pixels (spinedit Width). Fill frame by texture bg1 from folder background. It is possible to set transparency for texture (spinedit Transparency).
 Checked flag Pin and button
 ![]() from this group allow to put four small pictures in corners of framed (or frameless) image. Spinedit Offset sets offset for pin images in the direction of image center or image corners.
from this group allow to put four small pictures in corners of framed (or frameless) image. Spinedit Offset sets offset for pin images in the direction of image center or image corners.
Use of effects for source image or texture.
Dialog Effects you can see after selection menu item Image / Effects as well as after pressing button ![]() in group Background or in parameters of Frame Styles: Exact, Icon.
in group Background or in parameters of Frame Styles: Exact, Icon.
- You can save created frame (composed of one outside frame and (or) one inside frame together with pins) as a new template. For this purpose select menu item File / Templates or click the toolbar button ![]() . In the opened dialog Templates press the button
. In the opened dialog Templates press the button ![]() to add a new template to the list. In dialog Add template input name of your template and press ОК.
to add a new template to the list. In dialog Add template input name of your template and press ОК.
- You can save created image (together with frames and pins) as BMP, JPEG, GIF, SWF or PNG- file with the help of menu item File / Export or toolbar button ![]() . For JPEG- files you can set compression quality.
. For JPEG- files you can set compression quality.
- You can save only frame. For this purpose hide your image (menu item Image / Hide / Show). If necessary change frame size (menu item Image / Size) and background color (menu item Image / Background color). Then use toolbar button ![]() .
.
- You can save image (texture) after application of effects from dialog Effects directly.
Easy Frame Creator supports internationalization. Program interface may be seen in one of human languages. It includes menus, screen messages, all texts used in interface. To change language press toolbar button ![]() . Select a language and press OK.
. Select a language and press OK.